How many times have we been put off from making a lovely motif blanket, waistcoat or whatever but been put off by those dreaded words "Now weave in all the ends and sew the motifs together." Whut?
Noooooooooooooo...
You don't have to do that!
Here's a joining method that's so-ooo easy to do - why don't more people use it?
Spread the word!
OK, here's how.
First, make one complete motif. I'm using a basic granny square, with a 3tr-3ch-3tr group in the corners, and at the sides, 1ch between the 3tr blocks.
It honestly doesn't really matter what kind of pattern you're using - the technique's the same, as long as it's one that has some chain along the final round.
Now, make another - complete all rounds
except the final one.
Let's say we're going to join in a strip, to begin with.
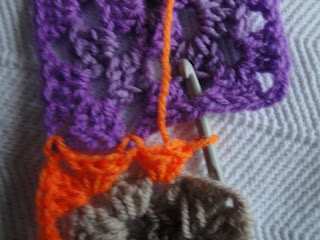
Here's a completed 3-round motif (purple), and another one with just two rounds.

Start the final round of the second motif by joining on a new colour - in this case, a lovely orange. Double the new yarn over, hook it through a corner chain-space (see left), and make 3 chain to equal your first treble using both strands (below).
This makes a secure fasten-on, and you can then lie the remaining thread along the top of your work and cover it as you go - orange on orange will show less than orange on brown, for example.
Work round to your next corner, and make 3tr, and the first one of the 3ch. See left.
Now, here's the slightly tricky bit.

Push your hook into the corner chain space of the first motif - the purple one (see below).
Now, work a slip-stitch...

...then another chain, and then the rest of the group.
Instead of working a
chain before the next group of trebles, do another s/s into the corresponding gap.
Work from one motif to the other until you've reached the next corner.

Ta-daaaaaa!
Now, if you are joining the sides, too, just carry on round in the same fashion, incorporating the next-door motif as you go.
Watch this space for more joining options.


 Push your hook into the corner chain space of the first motif - the purple one (see below).
 ...then another chain, and then the rest of the group.


